Netty执行流程
首先配置gradle构建的项目环境。
使用工具Intellij Idea IDE。先下载gradle到本地目录,然后指定其路径,参考下图。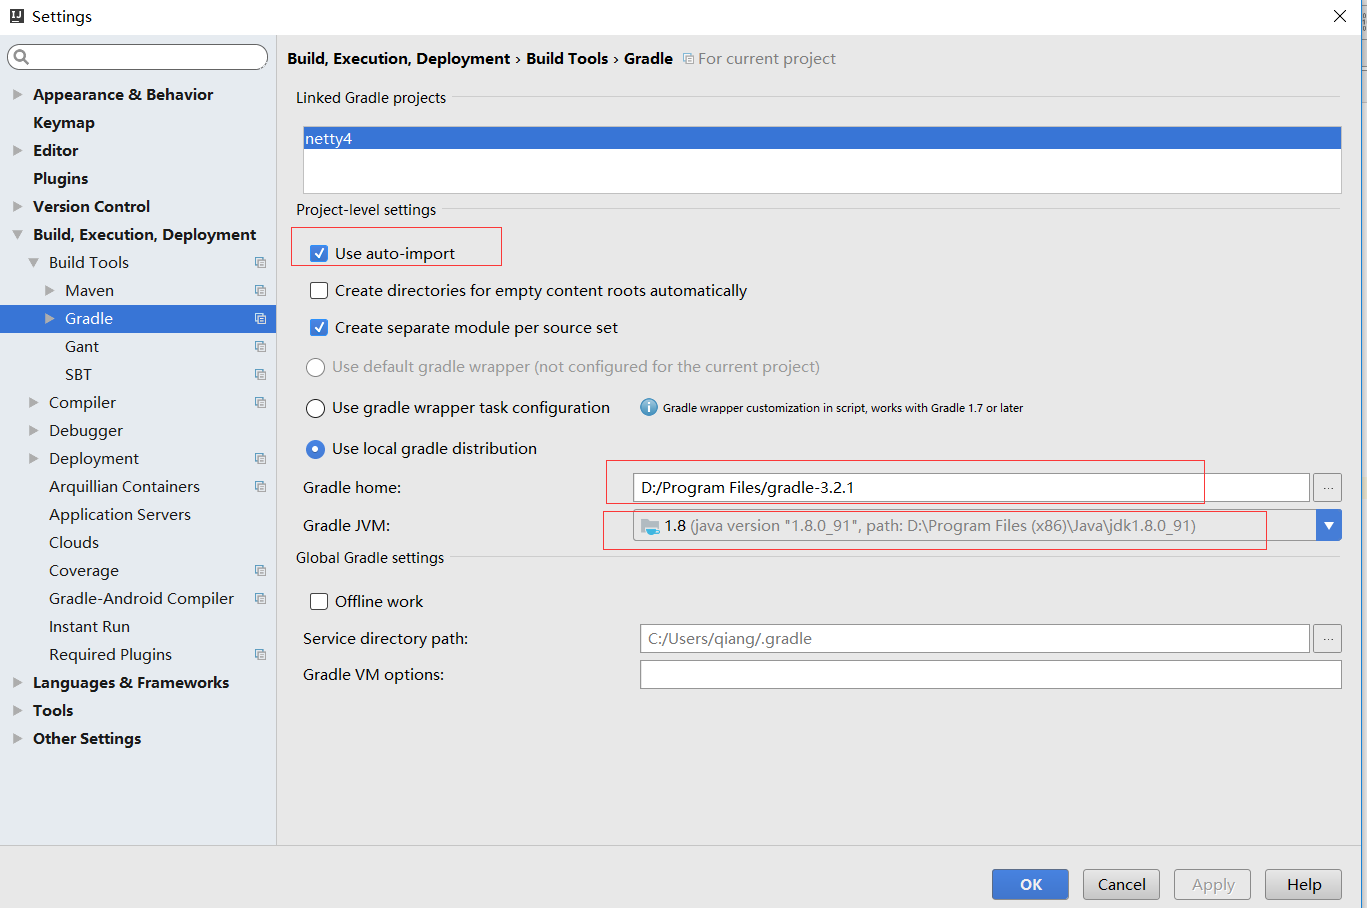
创建java项目: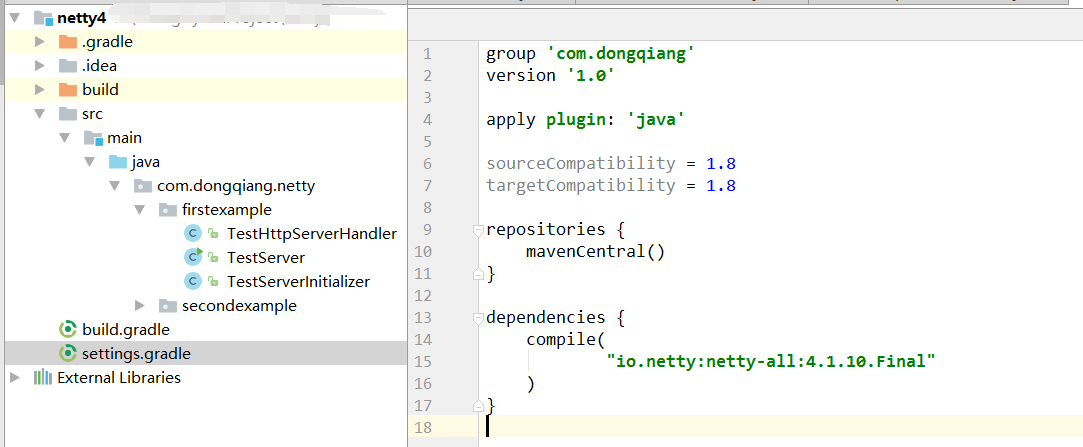 指定当前使用的netty版本。
在第一个例子中,创建了三个java文件,其中TestServer为主调文件。还是直接上代码:
①TestServer.java
package com.dongqiang.netty.firstexample;

import io.netty.bootstrap.ServerBootstrap;
import io.netty.channel.ChannelFuture;
import io.netty.channel.EventLoopGroup;
import io.netty.channel.nio.NioEventLoopGroup;
import io.netty.channel.socket.nio.NioServerSocketChannel;

public class TestServer {
    public static void main(String[] args) throws Exception {
        EventLoopGroup bossGroup = new NioEventLoopGroup();
        EventLoopGroup workerGroup = new NioEventLoopGroup();

        try {
            ServerBootstrap serverBootstrap = new ServerBootstrap();
            serverBootstrap.group(bossGroup, workerGroup).channel(NioServerSocketChannel.class)
                    .childHandler(new TestServerInitializer());

            ChannelFuture channelFuture = serverBootstrap.bind(8899).sync();
            channelFuture.channel().closeFuture().sync();
        } finally {
            bossGroup.shutdownGracefully();
            workerGroup.shutdownGracefully();
        }
    }
}
首先,在main方法中创建了两个事件循环组(EventLoopGroup)。 bossGroup主要负责接收请求,然后将请求交给workerGroup处理。ServerBootstrap 是netty提供的启动器类。group()方法将bossGroup和workerGroup关联起来,channel提供了一个通道,而请求的处理借助于childHandler()中我们自己实现的Handler处理器。这里启动器绑定了server的监听的端口,并通过sync()进行阻塞监听。
②TestServerInitializer.java
来看看自定义的处理器:
package com.dongqiang.netty.firstexample;

import io.netty.channel.ChannelInitializer;
import io.netty.channel.ChannelPipeline;
import io.netty.channel.socket.SocketChannel;
import io.netty.handler.codec.http.HttpServerCodec;


/**
 * Server初始化器
 */
public class TestServerInitializer extends ChannelInitializer<SocketChannel> {
    protected void initChannel(SocketChannel ch) throws Exception {

        ChannelPipeline pipeline = ch.pipeline();
        pipeline.addLast("HttpServerCodec", new HttpServerCodec());
        pipeline.addLast("TestHttpServerHandler", new TestHttpServerHandler());

    }
}
这里根据SocketChannel获取了一个管道,然后添加了两个ChannelHandler,第一个是Netty提供的默认实现,第二个是我们自定义的用来拦截请求的处理器。
③TestHttpServerHandler.java
package com.dongqiang.netty.firstexample;

import io.netty.buffer.ByteBuf;
import io.netty.buffer.Unpooled;
import io.netty.channel.ChannelHandlerContext;
import io.netty.channel.SimpleChannelInboundHandler;
import io.netty.handler.codec.http.*;
import io.netty.util.CharsetUtil;


/**
 * 自定义处理器
 */
public class TestHttpServerHandler extends SimpleChannelInboundHandler<HttpObject> {

    /**
     * 接收客户端请求,并发出响应
     * @param ctx
     * @param msg
     * @throws Exception
     */
    protected void channelRead0(ChannelHandlerContext ctx, HttpObject msg) throws Exception {

        System.out.println(msg.getClass());
        System.out.println(ctx.channel().remoteAddress());

        if (msg instanceof HttpRequest) {
            HttpRequest httpRequest = (HttpRequest) msg;

            System.out.println("请求方法名:" + httpRequest.method().name());

            if ("/favicon.ico".equals(httpRequest.uri())) {
                System.out.println("请求的favicon.ico");
                return;
            }

            //需要返回给客户端的信息
            ByteBuf content = Unpooled.copiedBuffer("hello world", CharsetUtil.UTF_8);

            //构造response对象
            FullHttpResponse response = new DefaultFullHttpResponse(HttpVersion.HTTP_1_1, HttpResponseStatus.OK, content);

            //设置响应头
            response.headers().set(HttpHeaderNames.CONTENT_TYPE, "text/plain");
            response.headers().set(HttpHeaderNames.CONTENT_LENGTH, content.readableBytes());

            //回写客户端
            ctx.writeAndFlush(response);
            ctx.channel().close();
        }
    }

    @Override
    public void handlerAdded(ChannelHandlerContext ctx) throws Exception {
        System.out.println("handlerAdded.");
        super.handlerAdded(ctx);
    }

    @Override
    public void channelActive(ChannelHandlerContext ctx) throws Exception {
        System.out.println("channelActive.");
        super.channelActive(ctx);
    }

    @Override
    public void channelRegistered(ChannelHandlerContext ctx) throws Exception {
        System.out.println("channelRegistered.");
        super.channelRegistered(ctx);
    }

    @Override
    public void channelInactive(ChannelHandlerContext ctx) throws Exception {
        System.out.println("channelInactive.");
        super.channelInactive(ctx);
    }

    @Override
    public void channelUnregistered(ChannelHandlerContext ctx) throws Exception {
        System.out.println("channelUnregistered.");
        super.channelUnregistered(ctx);
    }

    @Override
    public void handlerRemoved(ChannelHandlerContext ctx) throws Exception {
        System.out.println("handlerRemoved.");
        super.handlerRemoved(ctx);
    }

}
这个是我们自定义Handler的实现,其中最重要的方法就是channelRead0(),它用来接收客户端发出的请求并处理响应。通过curl工具在命令行执行:
curl http://localhost:8899
我们可以在控制台看到如下执行结果:
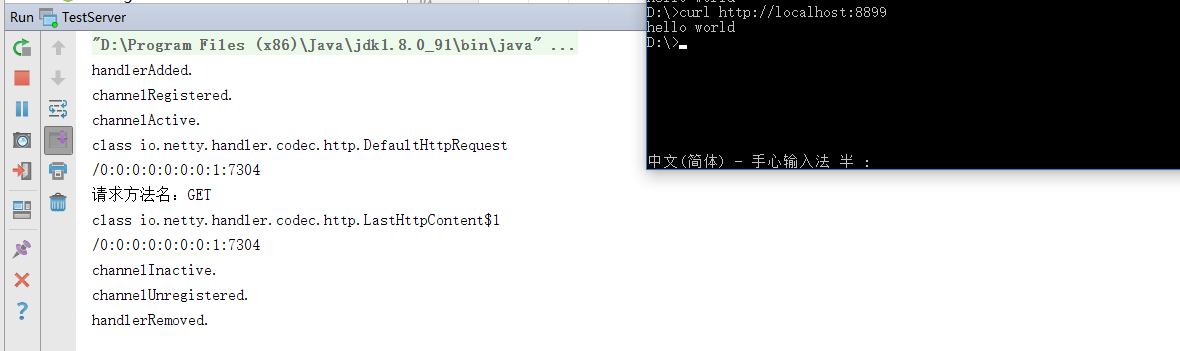 可以看到,hello world被回写到客户端。
另外,从上面命令行的打印来看,我们可以看到Handler执行的生命周期。
如上图所示,首先会执行handlerAdded(),接着去注册channel,然后激活channel。中间两个class打印,一个是Netty实现的默认Handler处理请求,第二个是我们实现的。当请求处理完毕后,一次执行channel失活,channel解除注册,最后移除handler。
还有一个需要注意的细节,上述我们看到的生命周期打印,是基于上面代码中调用了如下语句:
ctx.channel().close();
如果我们不调用这个,实际上会发现,当我们curl执行完毕的时候执行是正常的,但是在浏览器中输入http://localhost:8899。打印却是如下:
handlerAdded.
channelRegistered.
channelActive.
class io.netty.handler.codec.http.DefaultHttpRequest
/0:0:0:0:0:0:0:1:10010
请求方法名:GET
class io.netty.handler.codec.http.LastHttpContent$1
/0:0:0:0:0:0:0:1:10010
channelInactive.
channelUnregistered.
handlerRemoved.
class io.netty.handler.codec.http.DefaultHttpRequest
/0:0:0:0:0:0:0:1:10010
请求方法名:GET
请求的favicon.ico
class io.netty.handler.codec.http.LastHttpContent$1
/0:0:0:0:0:0:0:1:10010
为什么会这样,这是因为使用的HTTP 1.1协议,会有个keep alive的时间,当我们刷新的时候,会出现上一次的结束日志,但是本次的并没有超时,所以就没有打印出来。
关于里面那个favicon.ico的日志是怎么回事?在curl访问的时候并不会出现,但是Chrome在访问的时候,会默认多产生一个请求,去请求网页的图标。如下:

所以会出现两次请求。